¿Cómo puedo trabajar con listas de informes?
Todos los informes son altamente personalizables. Puedes cambiarles el nombre, agregar tus propios filtros o columnas, agregar nuevos informes o eliminar los antiguos. En este artículo, repasaremos varias configuraciones que puedes realizar.
1. Agregar nuevos informes
Si no desea cambiar la configuración de los informes estándar, puede optar por agregar otro informe haciendo clic en Nuevo informe bajo cualquiera de las categorías.
A continuación, se le mostrará una descripción general de todos los informes estándar disponibles para esa categoría. Elija el informe que desee agregar a la lista y personalícelo.
2. Configuración general
Ya sea que estés viendo los informes de Reservas, Facturas o Pagos, tienen algunas configuraciones que se aplican a todos.
Al hacer clic en los 3 puntos, puedes seleccionar 4 opciones:

– Ahorrar cualquier cambio que haya realizado en la configuración del informe. Si no guarda los cambios, la próxima vez que abra el informe, volverá a la configuración anterior.
– Compartir el informe específico con un colega, para que puedan usar el mismo informe que usted ha creado.
– Ajustes Es donde puede cambiar el nombre del informe y se puede seleccionar el formato de fechas/horas/moneda.
– Eliminar le permite eliminar el informe por completo.
Al hacer clic en el icono de estrella, puede agregar un informe a Tus favoritos. Esto coloca el informe en la parte superior del menú, para que pueda acceder fácilmente a los informes que utiliza con frecuencia.


Exportando datos
Si desea descargar/exportar sus datos, puede hacerlo fácilmente haciendo clic en el descargar botón en el lado derecho de la lista:
Allí puede seleccionar si desea descargar la lista como un archivo Excel o CSV y buscar descargas anteriores:

3. Configuración de filtros
Si desea filtrar por determinados criterios, puede optar por aplicar un filtro. Al hacer clic en Añadir filtro, puede agregar filtros a cada informe.

En el menú “Añadir filtro” puedes elegir entre varios filtros de diferentes categorías:
Los filtros que puedes seleccionar varían según la categoría. Por ejemplo, los informes de reservas tienen opciones de filtro diferentes a las de los informes de facturas.
Después de seleccionar el filtro, puede agregar una condición. Las condiciones del filtro dependen del filtro específico.
Un filtro de “fecha de creación” le permitirá especificar la condición en función de la fecha:
Un filtro de “estado” simplemente le permitirá seleccionar un estado determinado:
Al hacer clic en los 3 puntos al lado del filtro, puede eliminar el filtro o moverlo de izquierda a derecha:

4. Configuración de columnas
En cada informe es posible cambiar, agregar, mover o eliminar las columnas en la descripción general.
Para cambiar la configuración, incluido el nombre, de una columna individual, haga clic en los 3 puntos:
Agregar columnas
A través del símbolo + en la parte superior derecha, puede agregar columnas adicionales a su informe:
Allí verá listas de las distintas columnas que puede agregar; seleccione la columna para agregarla a la descripción general.
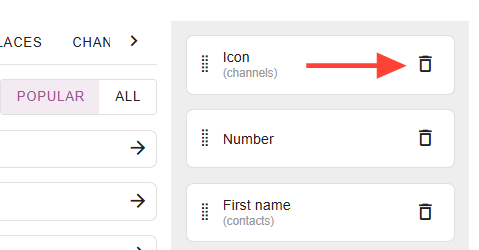
En el mismo menú donde puedes agregar columnas, también puedes cambiar rápidamente el orden de las columnas o eliminar determinadas columnas.
Haga clic en la papelera para eliminar una columna:
Puede hacer clic y mantener presionados los puntos pequeños para arrastrar una columna a una posición diferente.
5. Creación de totales
Después de configurar todos los filtros y columnas, es posible que desee ver algunos montos totales sumados.
Haga clic en el botón “estadísticas” en el lado derecho de su lista:

Allí podrás seleccionar varias formas de visualizar los datos seleccionados, haciendo clic en los diferentes iconos:

También puede seleccionar los datos por los que desea agrupar las métricas y seleccionar métricas específicas en las que desea basar la información:

Por ejemplo: alojamiento “agrupado por” Nombre, establezca 1 métrica como la suma de la reserva Total, la otra métrica como el recuento de reservas Número.
Esto le brindará una descripción general del monto total de la reserva y la cantidad de reservas en un período de tiempo seleccionado:
