¿Cómo funciona el tablero de programación?
Escrito originalmente en inglés, cualquier error de traducción debe compararse con el artículo original.
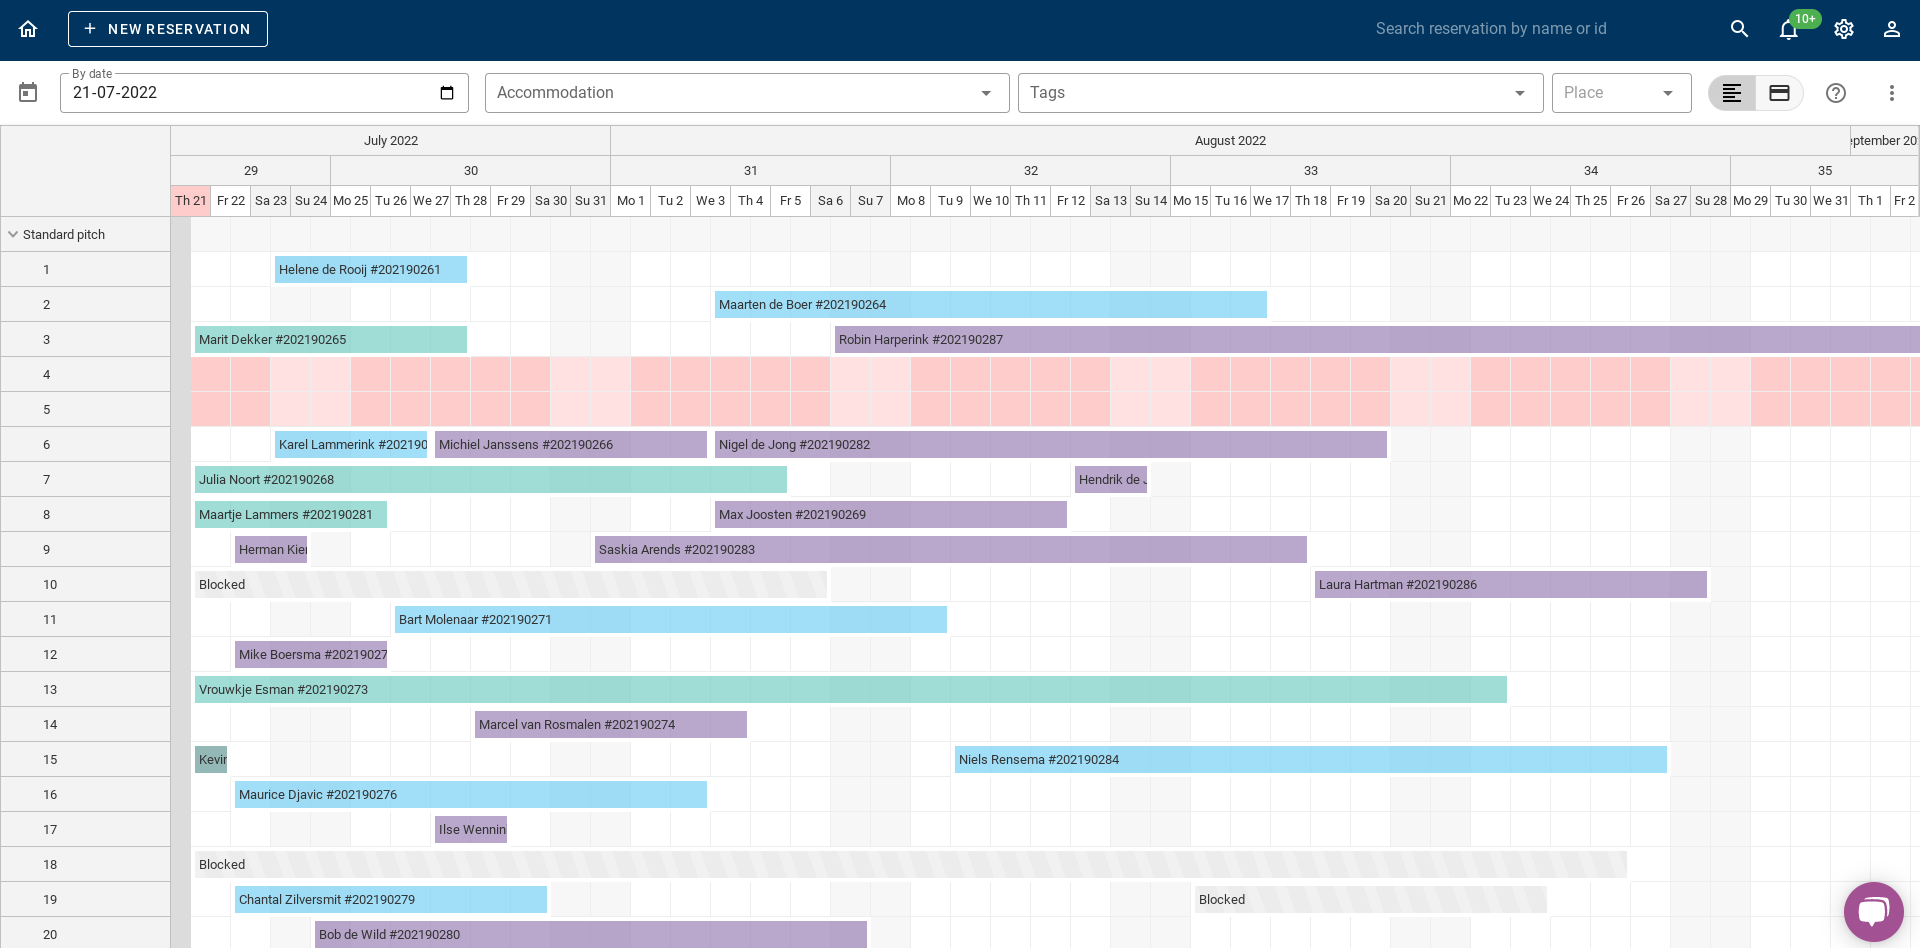
El tablón de horarios es una vista general de todas las reservas en un período seleccionado. Aquí puede ver quién, cuándo y dónde vienen los huéspedes a su camping. También es posible realizar reservas desde el tablón de horarios. Hay muchas formas de ver el tablón de horarios. Es posible seleccionar lo que desea ver en el tablón de horarios. Pueden ser vacaciones especiales, períodos o personas que ya pagaron y muchas más variaciones. Este artículo lo explica todo paso a paso.
1. Vista de estado
2. Vista de pago
3. Alojamiento, etiquetas y filtros de lugares
4. Agregar y eliminar un período bloqueado
5. ¿Cómo muevo una reserva en el tablero de horarios?
6. ¿Cómo hacer una reserva en el tablón de horarios?
7. Búsqueda rápida de un período especial
1. Vista de estado
En el tablero de programación, puede ver la vista de estado y la vista de pago. En la imagen a continuación, puede ver en un círculo rojo dónde puede cambiar entre la vista de estado y la vista de pago. Este párrafo analiza la vista de estado.

La vista de estado le permite ver el estado de una reserva. En este capítulo se explican los estados que existen y el significado de los colores en el tablero de programación.
1.1: Estado confirmado
Como puedes ver en la imagen de arriba, las reservas marcadas en azul son reservas confirmadas.
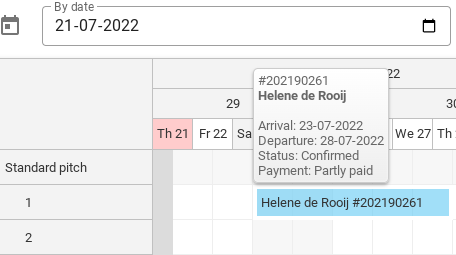
1.2: Estado registrado
Como puede ver en la imagen de arriba, las reservas marcadas en verde son reservas que se registran.
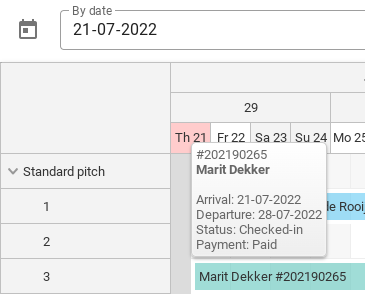
1.3: Estado verificado
Como puede ver en la imagen de arriba, las reservas marcadas en verde oscuro son reservas que han sido retiradas.
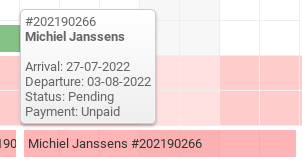
1.4: Estado pendiente
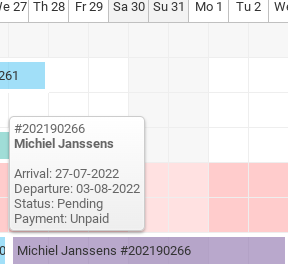
Como puede ver en la imagen de arriba, las reservas marcadas en violeta son reservas pendientes. Así que todavía hay que confirmarlos.
1.5: Estado bloqueado
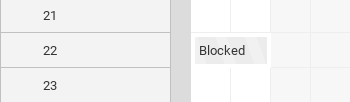
Como puede ver en la imagen de arriba, las reservas marcadas en gris claro/rayas son períodos bloqueados.
2. Vista de pago
Además de la vista de estado, también es posible ver la vista de pago por reserva. En la imagen a continuación, puede ver dónde puede cambiar entre la vista de estado y la vista de pago en el tablero de programación.
2.1: Parcialmente pagado
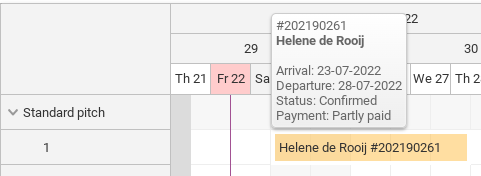
Como puedes ver en la imagen de arriba, las reservas parcialmente pagadas están marcadas en amarillo.
2.2: Pagado
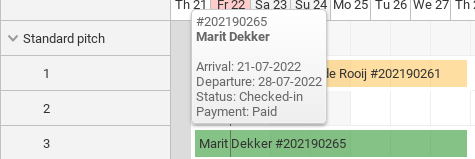
Como puede ver en la imagen de arriba, las reservas totalmente pagadas están marcadas en verde.
2.3 No pagado
Como puedes ver en la imagen de arriba, las reservas impagas están marcadas en rojo.
3. Alojamiento, etiquetas y filtros de lugares
En este párrafo se describe cómo puedes filtrar el tablero de horarios por tipo de alojamiento, lugar y etiquetas.
3.1 Filtro de alojamiento
En la imagen de abajo puedes ver el filtro de alojamientos marcado en rojo. Si quieres ver solo 1 alojamiento en el tablero de planificación, puedes hacer clic en este botón. Luego puedes seleccionar los alojamientos que deseas ver.

3.2 Filtro de etiquetas
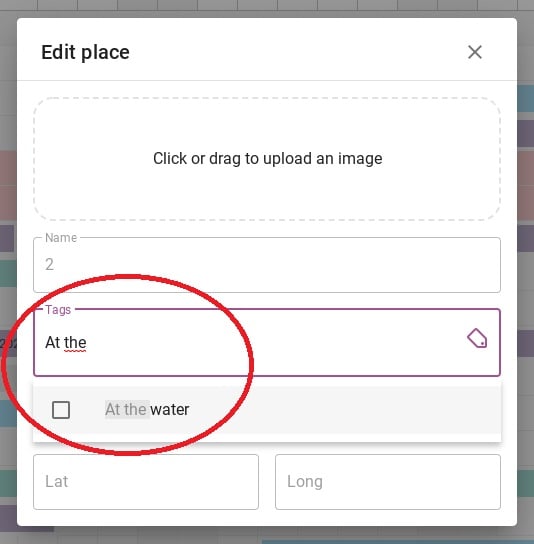
Para filtrar por etiqueta, primero debe agregar las etiquetas a determinados lugares. Para ello, haga clic en el número del lugar donde desea agregar una etiqueta. En la imagen de abajo, está marcado con un círculo rojo donde puede hacer clic.
Esto te llevará a la pestaña de abajo. Aquí puedes agregar una etiqueta determinada a un lugar bajo el encabezado 'Etiquetas'. En la foto de abajo puedes ver en el círculo rojo que ahora agrego como ejemplo la etiqueta 'En el agua' al lugar 2.
En la imagen de abajo, puedes ver que he agregado la etiqueta 'En el agua' en el área rodeada de un círculo rojo en la parte superior, por lo que solo verás el lugar 2. El lugar donde acabo de agregar la etiqueta.

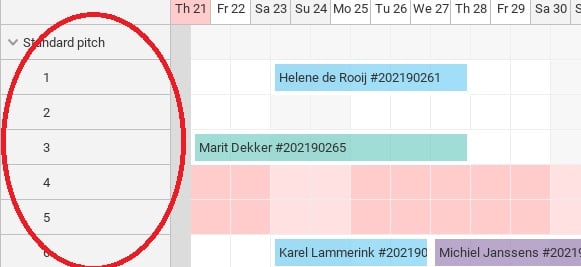
3.3 Filtro de lugar
En la imagen de abajo puedes ver el filtro de lugar rodeado de rojo. Con este filtro puedes filtrar un lugar específico. Cuando hagas clic en un lugar, solo se mostrarán las reservas de ese lugar específico en el tablero de horarios.

4. Agregar y eliminar un período bloqueado
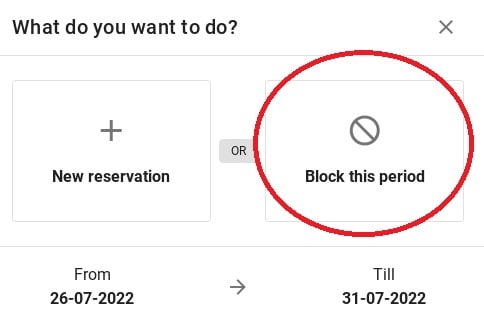
Si desea bloquear un lugar determinado durante un período de tiempo determinado, puede agregar un bloqueo desde el Tablero de planificación. Use el mouse para seleccionar el período que desea bloquear. (Vea la imagen a continuación).
Luego aparecerá una notificación preguntándote si deseas hacer una reserva para este período o bloquear este período. Haga clic en 'Bloquear este período'. La siguiente imagen muestra cómo se ve la notificación.
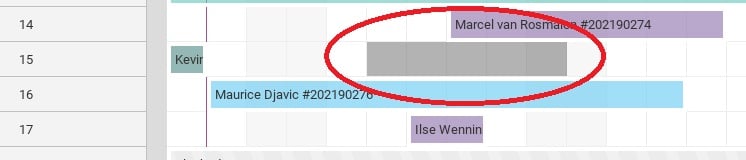
Luego puede ver en la imagen a continuación que se ha configurado el bloqueo. Para eliminar este bloque, simplemente haga clic en él. El bloque se mostrará automáticamente eliminar.

5. ¿Cómo muevo una reserva en el tablero de horarios?
Desde el tablero de programación es posible mover las reservas a una ubicación diferente. De esta manera, tendrá una visión general sencilla de los espacios libres por parcela. A continuación se explica cómo puede mover una reserva.
Consejo: cuando muevas reservas de cualquier forma, ¡comprueba siempre si las fechas y los precios son correctos!
5.1: Mover a otra fecha
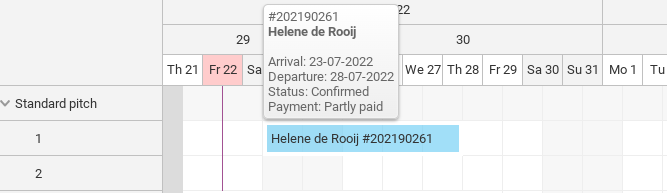
A continuación se muestra un ejemplo de reserva. Estos huéspedes se alojan desde el 23-07-2022 hasta el 28-07-2022. Supongamos que estos invitados llaman e indican que les gustaría llegar 2 días más tarde y salir 2 días más tarde.
Usted ve en el tablero de programación que 2 días después de esta reserva todavía no hay nada en el tablero de programación y ¿sería posible mover esta reserva para el huésped?
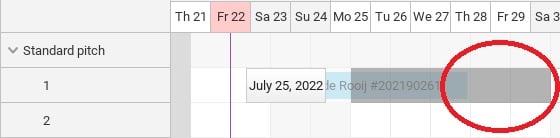
Coges la reserva con el ratón y la arrastras hasta la fecha deseada. La siguiente imagen muestra cómo hacer esto.
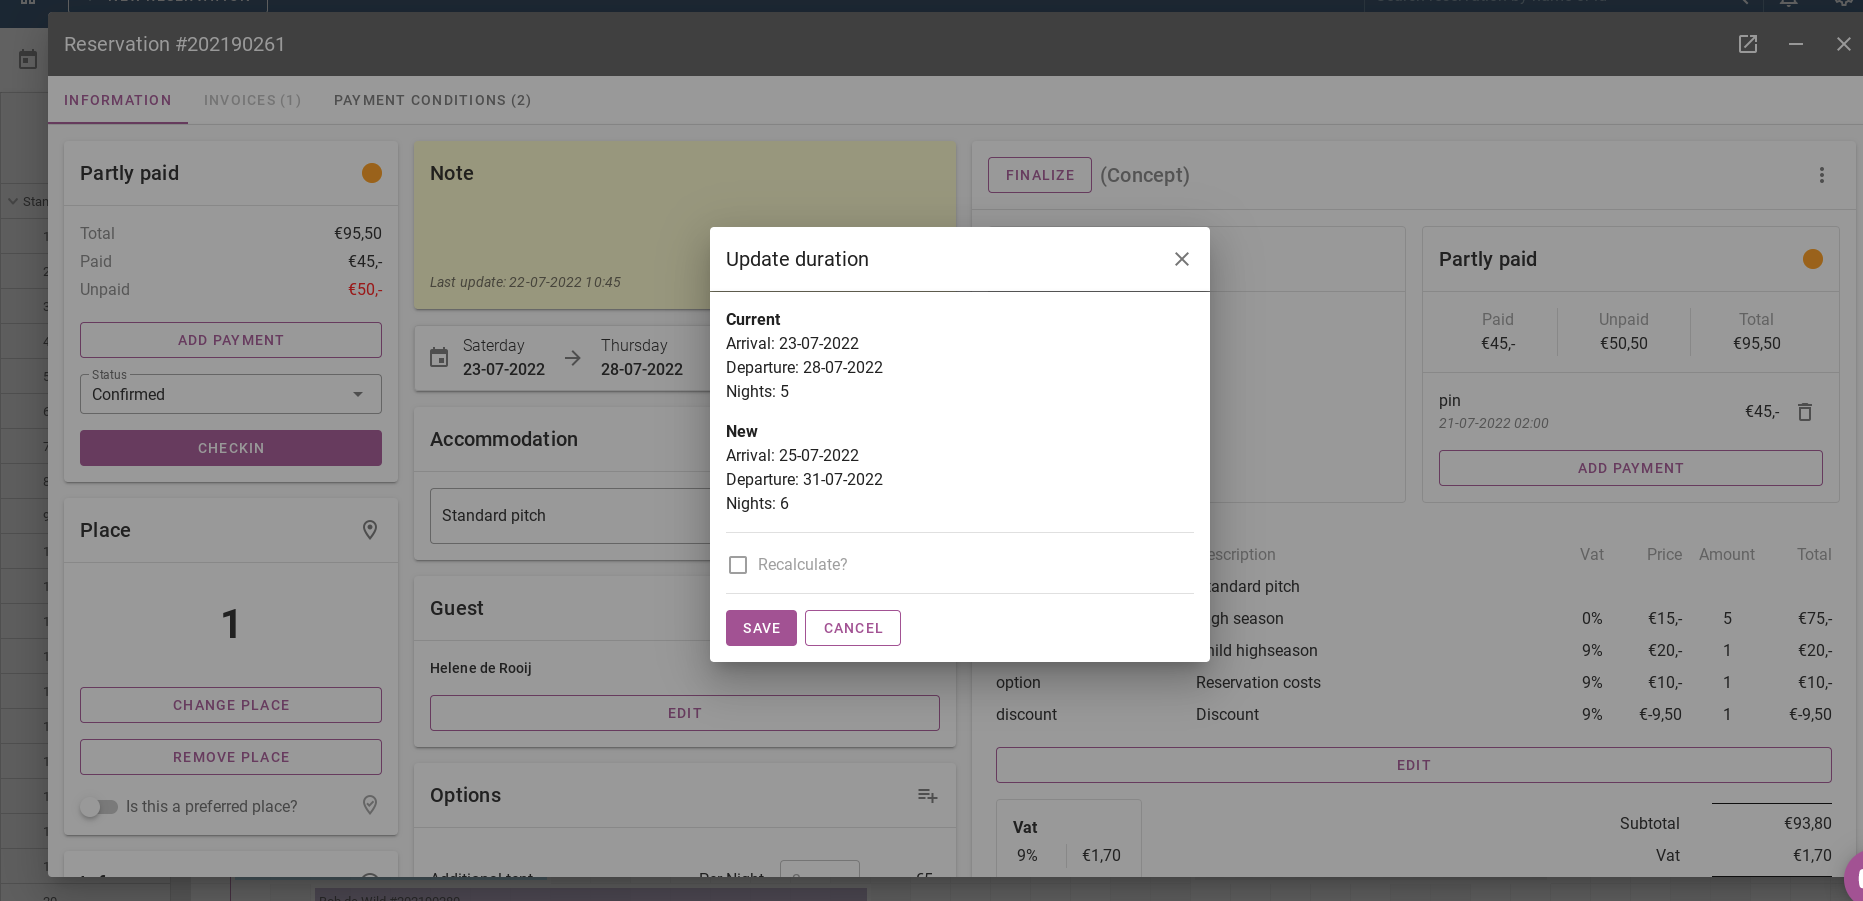
Si liberas la reserva con el ratón, el sistema abrirá automáticamente la reserva. El sistema también solicitará una "duración de la actualización". Esto significa que puedes recalcular la reserva y ver si las nuevas fechas son correctas. Si todos los datos son correctos, haga clic ahorrar. La siguiente imagen muestra cómo se ve la duración de la actualización.
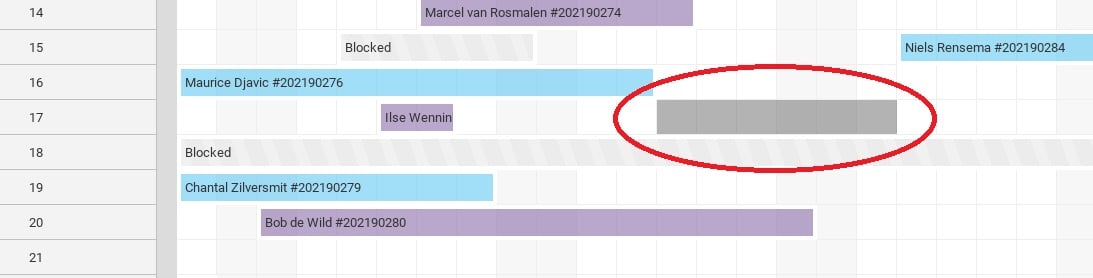
5.2: Mudarse a otro lugar
También puede mover una reserva existente a otro lugar en el tablero de planificación haciendo clic en ella con el mouse. La siguiente imagen muestra cómo funciona esto.
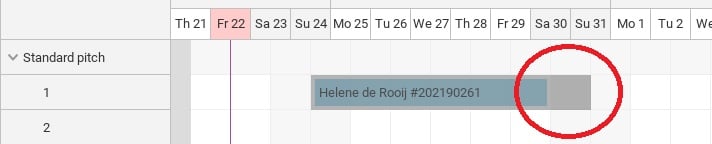
5.3: Ampliar o acortar una reserva
Para alargar o acortar una reserva, toma el lado de la reserva en el tablero de planificación con el mouse (ver imagen a continuación). Luego arrástrelo a otra fecha.
Nuevamente el sistema le pedirá un nuevo cálculo de la reserva, verifique esto cuidadosamente.
6. ¿Cómo hacer una reserva en el tablón de horarios?
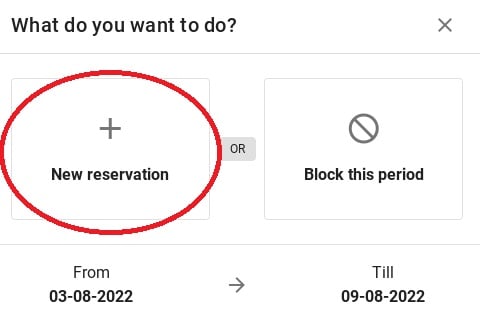
Para realizar una reserva desde el tablón de horarios, seleccione el período con el ratón. Esto se hace como se muestra en la imagen a continuación.
Se te mostrará nuevamente la notificación preguntándote si deseas agregar un bloque o realizar una nueva reserva. Ahora haga clic en 'Nueva reserva' botón.
Después de hacer clic en el botón 'Nueva reserva', accederá a la página donde se pueden ingresar todos los detalles. Para ver una explicación detallada de cómo hacer una reserva haga clic aquí. Luego serás dirigido a otro artículo.
7. Búsqueda rápida de un período especial
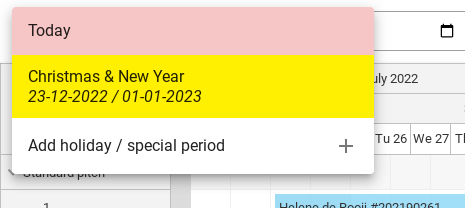
A continuación se muestra una imagen en la que se puede ver el borde superior del tablero de planificación. El calendario rodeado de un círculo rojo es un botón que permite pasar rápidamente a otra fecha en el tablero de planificación.

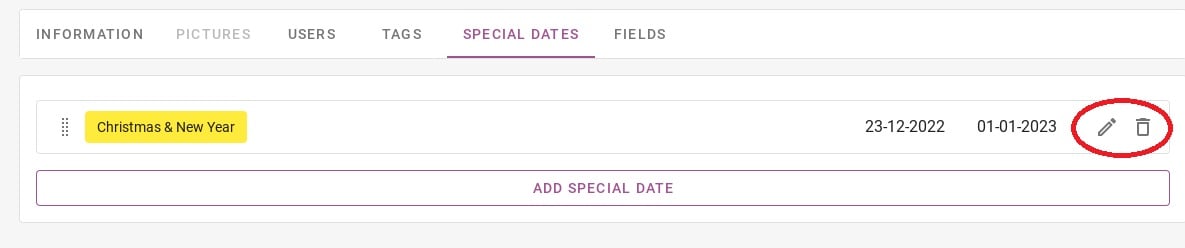
En la imagen de abajo, puedes ver lo que aparece cuando mueves el ratón sobre este botón. Aquí puedes ver un ejemplo del período Navidad y Año Nuevo. Cuando haces clic en este período, el tablero de planificación saltará automáticamente a esta fecha.
También puede agregar períodos de vacaciones y otros períodos especiales haciendo clic en ´Añadir vacaciones/periodo especial´.
Al hacer clic en ´Añadir vacaciones/periodo especial´, serás llevado a la página de abajo. Bajo el encabezado "Fechas especiales" Es posible introducir estas fechas. En un círculo rojo verás un lápiz y una papelera. Con el lápiz puedes cambiar este periodo existente y con la papelera puedes eliminar este periodo.
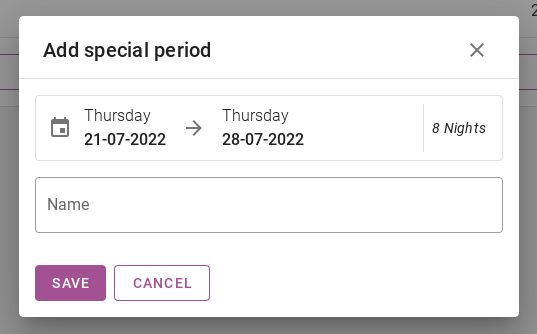
El botón de color violeta con el texto ´AÑADIR FECHA ESPECIAL´ se puede utilizar para añadir un nuevo periodo. En la imagen de abajo, puedes ver cómo se puede añadir este periodo. Introduces la fecha de inicio y de fin en el calendario y le das un nombre al periodo especial. Por último, pulsas guardar.
La imagen de abajo muestra un calendario rodeado de un círculo rojo. En este calendario, puede hacer clic en una fecha. El tablero de programación saltará a esa fecha y mostrará todas las reservas.
